Natural light from window (Light fabric curtain)
Distance from tree: ~3 feet
Canon Rebel T3, 50 mm lens, 1.8 f-stop, 15 shutter speed, Auto ISO
Natural light from window (light, sheer white curtain).
Distance from tree: ~6 feet.
(No tripod, though I'd recommend one.)
So this is a super quick tutorial:
Note: Most of these I used a Canon 50mm fixed lens.
Fixed meaning you can't adjust the zoom.
The 50mm lens is a great lens, gets clear images and can get a low f-stop,
you just have to move back and adjust your self to fill your frame rather than zoom in and out with the lens.
Note: Most of these I used a Canon 50mm fixed lens.
Fixed meaning you can't adjust the zoom.
The 50mm lens is a great lens, gets clear images and can get a low f-stop,
you just have to move back and adjust your self to fill your frame rather than zoom in and out with the lens.
Canon Rebel T3, 50mm lens, 1.8 f-stop, 50 shutter speed, Auto ISO
Natural light from window with light curtains.
Distance from tree: ~4 feet.
Closer vs. Farther:
Canon Rebel T3, 50mm lens, 1.8 f-stop, 60 shutter speed, Auto ISO
Again natural light from window.
Distance from tree: ~5ft.
Distance from tree: ~5ft.
For the white background:
I positioned the chair just inches from the window and a few feet from the tree.
The light weight fabric allowed light in without it casting harsh shadows.
The light weight fabric allowed light in without it casting harsh shadows.
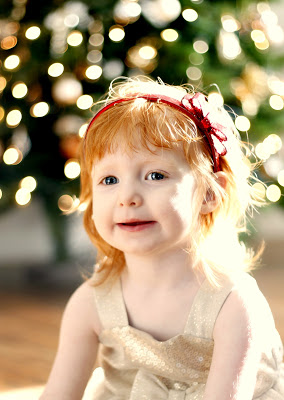
How far away/close your subject is to the lights will make your Light Blur different.
You can see the size of halos the light gives off changes.
You can see the size of halos the light gives off changes.
THE FURTHER AWAY:
the bigger the blur!
(Like the one above.)
(Make sure your f-stop is set at the lowest.)
(Make sure your f-stop is set at the lowest.)
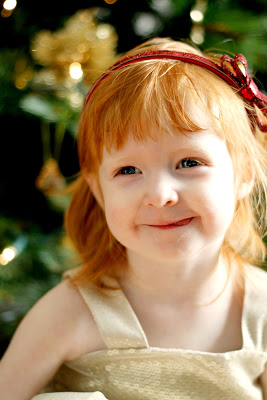
THE CLOSER SUBJECT IS:
the smaller the blur!
(Like the one below.)
Canon Rebel T3, 50mm lens, 1.8 f-stop, 60 shutter speed,, Auto ISO
Again natural light from window.
Distance from tree: ~6 inches.
Distance from tree: ~6 inches.
Remember the basics:
Low shutter speed=more light
Low f-stop=more blur in back/foreground and light.
A lower shutter speed can be tricky when it gets below 30.
A tripod can help keep it steady and try to have your subject hold still.
If you aren't familiar with your manual settings:
I suggest looking here.
She has some great explanations and tutorials!
AND AGAIN:
FAR AWAY.
CLOSE.
(The two above where without curtains, hence the harsh light.)
These are easy, quick photos to capture at home.
You can see the difference the dark vs. white tree makes in the over all appearance, as well as the distance.
It is so fun to play with and figure out the distance and blur.
*TIP*
To save your sanity, practice with an object before going for it with the kiddos!

Part 2: Christmas Tree Photos
Featured on:



Part 2: Christmas Tree Photos
Featured on:








This is awesome!
ReplyDeleteI have such a hard time explaining what I do with my photos or how I get a certain look... this is fantastic!
Would you consider guest posting on my photo blog? This is a great tutorial for beginners! :)
Superb!!! I ordered a Canon Rebel T3 on Black Friday.....just waiting for it to show up on my doorstep. And I know I won't know the first thing to do with it. Thanks for this! I'm pinning it so I can refer back!!!
ReplyDeleteThese photos are gorgeous! Thank you so much for the tips. I got a Canon T3i last Christmas. I'm still learning how to use the manual settings. Half the time I feel like I have no clue what I'm doing and I have to fuss with my camera forever until I magically get good photos. Again beautiful photos, and kids!
ReplyDeleteI have a T2i with that same lens, you've inspired me!! just joined as a follower
ReplyDeletethese are super helpful tips
ReplyDeleteespecially because
i have a t3 too
thanks so much
for sharing
at Fridays Unfolded!
{alison}
Thanks for the tips. I like the idea of trying it on an object before you try it with your kids! Love the quickness of the tutorial 2!
DeleteWould love a visit from you at my blog! Found you on Fridays Unfolded!
http://pintsizedtreasures.com/
Alison
Beautiful photos! I love the 50mm lens too. (I have the Nikon equivalent to the Canon T3.) I found you at Fridays Unfolded. I love your blog and I'm a new follower.
ReplyDeleteThose are stunning! I definitely need that kind of tutorial- especially since I host Photo Friday! Thank you for linking up! Happy weekend!
ReplyDeleteBeautiful photos!!! You're making me want a new camera! ;-)
ReplyDeleteVery nice. I don't have an adjustable camera, I don't think. I just point and shoot. Lens I have is not great. It distorts things badly. CanonSX 120. Beautiful, beautiful pictures. Linda
ReplyDeleteOh. My. Goodness. Those photos are just out of this world. And the children are just darling! Wow!
ReplyDeleteThe light and color are really amazing. Thank you for the tips.
<3 Christina at I Gotta Create!
Wildly Original link part is open.
what a beaautiful little girl
ReplyDeletecome see me over at http://shopannies.blogspot.com
These are such great tips! I wish I had known this when my kiddos were small. Thanks for sharing on the homemade holiday party.
ReplyDeleteMarilyn
4you-withlove.blogspot.com
Great tutorial and gorgeous little models you have! Thanks for sharing on "I Gotta Try That" Have a great week!
ReplyDeleteMarcie
I had to pin this! Thank you for taking the time to link up to Whimsy Wednesday! We LOVE your company☺
ReplyDeleteKelly at Smart! School {House}
http://www.smartschoolhouse.com
This is fabulous! Thanks! I am working on this all December!
ReplyDeleteSherry
Oh my in that first image she looks like a porcelain doll. Amazing image
ReplyDeleteMollyxxx
Awesome photographs. Really awesome and after week of people telling me via LinkedIn that I get way too close with my portraits and I should back it up a little, it is a wonderful relief to see someone talking about getting really close.
ReplyDeleteLou :-)
Magnificent photography ~ Your children are so beautiful! ~ Thanx for the tutorial ~ (A Creative Harbor) ~ aka (ArtMuse Dog^_^)
ReplyDeleteOh Wow! How stunning! Very gorgeous ! Thanks for the tips.
ReplyDeleteThanks for sharing with Foto Friday,
Lori
i have found you via fridays unfolded and am captivated by this glorious shot you took! it is def my favorite image of the season!
ReplyDeletefollowing you and hope you will follow back. looking forward to catching up on your blog.
hope you will find a moment to stop by and enter a giveaway i am hosting for followers (i hope you win!):
http://hellolovelyinc.blogspot.com/2012/12/personalized-lovely-giveaway.html
happy weekend to you!
michele
Great shots & tips. I can't wait to get a new camera. Visiting from DearCreatives.com
ReplyDeletewhat beauties you have there! STUNNING shots!!!! Love the tutorial!
ReplyDeleteThis is a fabulous tutorial! I can't wait to put these tips to use. That reaching for the cookie picture is by far my favorite :-)
ReplyDeleteThanks for linking up with the Winter Wonders & Holiday Happenings!
Darby @ lifewiththehawleys.blogspot.com
Thank you! Especially the tip of practicing with a non wiggly subject--Genius!
ReplyDelete